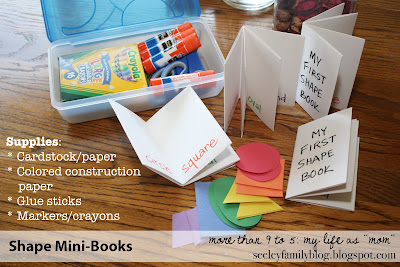
For their activity, I prepared mini-books for the kids. I discovered a great pin awhile back with instructions for how to make the book from a single sheet of paper. You can find a bigger picture with the explanations here. I used cardstock to make the books a little sturdier since they were for the 3 and under crowd. :) I labeled each page with the name of a different shape. Next, I cut out the shapes from colored construction paper. The kids were then able to match the shapes to the labels (I coordinated the colors of the labels and shapes to help the younger kids) and glue each shape to the correct page in the book. When they were finished, they could decorate the books with markers or crayons if they wanted to color too. The books were super simple to make and it made for a fun, educational craft.
For their snack, I decided to make my own homemade wheat crackers. I was going to just make the dough and let the kids cut out the shapes, but I decided this would probably be too time-consuming to have to bake them after that also, so I went ahead and did it myself. I cut them into the various shapes that I used in the books (circles, squares, triangles, ovals, rectangles and diamonds). I used the following recipe from the Finding Joy in My Kitchen blog.
Whole Wheat Crackers
Ingredients:
- 1 1/2 cups whole wheat flour, plus more for pastry mat
- 1/2 cup all-purpose flour
- 1/2 tsp salt
- 2 Tbsp butter, melted/softened
- 2/3 cup milk (or water)
- Sea salt (for sprinkling)
Directions:
Preheat an oven to 400 degrees Fahrenheit. In a large bowl, combine the flours and salt. Then add the butter and milk (or water). Mix until the dough sticks together and is easy to handle. Once well-combined, knead the dough out on a pastry mat dusted with additional flour. Roll the dough out to a 1/8" thickness. Cut out the shapes that you want (I used a fondant cutter because it was super easy to roll it through the dough), then transfer them to a cookie sheet. Lightly sprinkle with sea salt, and press it into the dough. Place the cookie sheet in the oven and bake for 20 to 25 minutes, or until crispy. Keep an eye on them to be sure they don't burn after 15 minutes.
Despite rolling the dough out very thin, the crackers really puffed up when I baked them! They were kind of crunchy on the outside, but hollow and still a bit soft/chewy on the inside. They were actually more like little mini-pitas than crackers, but they still tasted great! I stored these in an air-tight container, but they seemed to get more chewy, as opposed to crunchy, the next day.
To accompany the crackers, I decided to make my own hummus. It's something I have been wanting to do for awhile and for some reason never got around to doing it. I can't believe how simple it is to make! No more store-bought hummus for us. I turned to my favorite food blog for a recipe, Annie's Eats. I knew she wouldn't disappoint me, and sure enough, she didn't!
Restaurant-Style Hummus
Ingredients:
- 3 Tbsp lemon juice, from 1-2 lemons (I used ReaLemon juice)
- 1/4 cup water
- 6 Tbsp tahini (ground sesame seeds), stirred well
- 2 Tbsp extra virgin olive oil
- 1 (14 oz) can chickpeas (garbanzo beans), drained and rinsed
- 1 small garlic cove, minced or pressed through a garlic press (I used 3 small cloves)
- 1/2 tsp table salt
- 1/4 tsp ground cumin
- Pinch of cayenne pepper (I used ground red pepper)
- 1 Tbsp minced fresh cilantro or parsley (I omitted this ingredient)
Directions:
Combine the lemon juice and water in a small bowl or measuring cup. Whisk together the tahini and EVOO in a second small bowl or measuring cup.
Add the chickpeas, garlic, salt, cumin and cayenne pepper to a food processor.
Combine until almost fully ground, about 15 seconds. Scrape down the bowl with a rubber spatula. With the machine running, add the lemon juice-water mixture in a steady stream through the food tube. Scrape down the bowl and continue to process for 1 minute. With the machine running, add the oil-tahini mixture in a steady stream through the food tube. Continue to process until the hummus is smooth and creamy, about 15 seconds, scraping down the bowl as needed.
Transfer the hummus to a serving bowl, cover and let stand until the flavors meld, at least 30 minutes, or overnight, in the refrigerator. Store in an airtight container in the refrigerator for up to a week.
The hummus was super yummy and the kids gobbled it up! :) I would love to try some different varieties in the future (like roasted garlic or roasted red pepper), but for now, this serves as a great basic recipe for this popular dip. I also made some homemade basil pesto to serve too, with the abundance of basil we have growing right now. It was delicious with the crackers/mini pitas!
The boys and I had lots of fun with the shapes playdate and our small group of friends. There are, of course, lots of other activities that could be added for a more structured playdate, but we just let the kids play for the duration of the morning. :) What is your best idea for a fun, themed playdate?


Thanks so much for sharing the recipes--they look awesome and I will definitely be making the hummus. Yay that the playdate went so well!
ReplyDeleteYou're welcome! The hummus went quickly. Hubby was a big fan! :) I'm thinking about making another batch for my son's preschool lunches. A great, yummy source of protein. :)
Delete