Showing posts with label playdates. Show all posts

Saturday, November 3, 2012

Trick or Treat!

What a fun time we had this year for Halloween. We spread out the celebration, and managed to get more use out of the costumes than normal, too. Awesome! We kicked off the holiday this year by hosting a Halloween party at our house for the boys' friends.

Josh and I made a big pot of our Italian Chili and served it Cincinnati-style, over whole wheat spaghetti and topped with shredded cheddar cheese. I made some of my buttermilk cornbread and a pan of pumpkin crunch for dessert. Yum! For snacks, I offered some autumn mix (peanuts, golden raisins, candy corn and Reese's pieces) and corn chips with pumpkin salsa.

The spread on the table
Treat bags for the kids filled with the autumn trail mix
Corn chips and pumpkin salsa, autumn trail mix in front, and bowl of candy for guests

The kids all came in costume and played games organized by my friend, Amanda. She is awesome and came up with four fun games for the kids to play! They enjoyed some ghost bowling, a witch's hat ring toss, a pumpkin toss and skeleton limbo! Super fun!

The boys loved the ghost bowling!
Skeleton limbo was fun!

Ethan celebrated at his preschool on Tuesday. He got to wear his costume, they went Trick or Treating in the building, and they had a pizza party! I provided the drink boxes for the party. The only thing I don't like about his preschool is the fact that you can't make anything homemade to take in for parties, birthdays, etc. I love making special treats for the boys, so it's a real bummer that everything has to be store-bought and individually packaged, especially since I try to normally try to avoid buying these sorts of things! :( But, I made the best of it this time, and created mummy juice boxes! :)

Mummy juice boxes

They were super easy to make! And so adorable!! Ethan loved them and told me I was the best mom ever! Awww! To start on the juice boxes, I removed the straws. Take a piece of white tape (I used a couple rolls of 1 1/2" cloth tape from my athletic training days. I knew it would come in handy someday! Haha!) and punch a hole in it with a hole puncher. Place this tape on the top of the box with the hole lined up to the hole for the straw on the box. Place another piece of tape on the bottom of the box. Then cover the entire box with one layer of tape. Next, using a roll of tape that is split in half (into ~3/4"), add another layer with the strips crossing each other to give it a mummy-look. Once the box is covered entirely, add two adhesive googly eyes to the front. Place one more strip of tape on top, at an angle, over the eyes. Use one more strip of tape to affix the straw to the side of the juice box. VoilĂ ! A wonderful way to make a store-bought item "hand-made"! :) Here is a great video tutorial from Parents magazine.

My idea for costumes this year started with Ethan's request to be Daisy, our 6-year-old boxer. Every time I asked him what he wanted to be this year, that was his response. So, doggy costume it was! I wasn't sure at first how I was going to accomplish a Daisy-look, but I eventually figured it out. For Noah, I thought an animal costume would be cute too, as he loves them so much. His favorite animal is currently a cow, so cow it was! I was stumped for weeks about a costume for Daisy and how to tie them all together (I love themes!), but it finally came to me! Hey Diddle, Diddle! So, with the cow and doggy taken care of, that left Daisy to be the cat! ;)

Hey diddle, diddle, the cat and the fiddle,


The cow jumped over the moon.


The little dog laughed to see such fun

And the dish ran away with the spoon!

Once the costumes were done, I made the fiddle for Daisy, and moon and dish "pillows" for Noah and Ethan, respectively, along with a wooden spoon for Ethan. Perfect! I'll post more later on how I made their no-sew costumes!

On Halloween, the boys helped me make whole wheat pumpkin chocolate chip muffins, from Tracey's Culinary Adventures, for a snack. They were super tasty, just as I hoped they would be! I doubled the recipe, but it ended up making 30 muffins instead of 24. I used 1 1/2 cups of chocolate chips, instead of 2 cups, but I think 1 cup would have been enough. I also recommend baking for just 18-20 minutes total.


Our neighbors invited us to their church's Trunk or Treat, held inside the church, so we took them up on their offer to participate in our first ever "Trunk or Treat". Unfortunately, we didn't know how popular it was and were not prepared for the 45 minute wait outside to get in! :( It was a bit chilly, but Daddy kept the boys warm. :)


As Ethan would say, "Oh my goodness!" Melted my heart!
They had a great time trick or treating and playing at the church carnival.


When we got home from the church, we got Daisy, bundled the boys up in the wagon and went to a few of the neighbors' houses before bed time. It was a fun night.


I hope you and your little ones had a great Halloween, too!


Wednesday, September 5, 2012

Fun with Shapes!

A couple weeks ago, I hosted a playdate here at the house for some of the boys' new friends. My new friend, Amanda, had introduced me to the idea of a themed playdate, which is super fun! This was something new to us, but something she has been doing for years. She's such a fun mom! :) Following her lead, I decided to make shapes the theme of our playdate, as we had covered colors the week before, at her house.

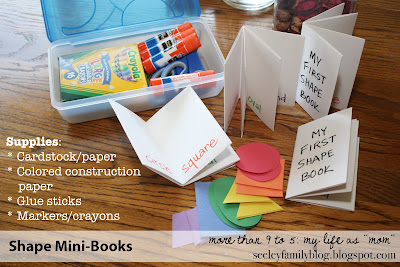
For their activity, I prepared mini-books for the kids. I discovered a great pin awhile back with instructions for how to make the book from a single sheet of paper. You can find a bigger picture with the explanations here. I used cardstock to make the books a little sturdier since they were for the 3 and under crowd. :) I labeled each page with the name of a different shape. Next, I cut out the shapes from colored construction paper. The kids were then able to match the shapes to the labels (I coordinated the colors of the labels and shapes to help the younger kids) and glue each shape to the correct page in the book. When they were finished, they could decorate the books with markers or crayons if they wanted to color too. The books were super simple to make and it made for a fun, educational craft.

Shape Mini-Books


For their snack, I decided to make my own homemade wheat crackers. I was going to just make the dough and let the kids cut out the shapes, but I decided this would probably be too time-consuming to have to bake them after that also, so I went ahead and did it myself. I cut them into the various shapes that I used in the books (circles, squares, triangles, ovals, rectangles and diamonds).  I used the following recipe from the Finding Joy in My Kitchen blog.

Whole Wheat Crackers

Ingredients:
  • 1 1/2 cups whole wheat flour, plus more for pastry mat
  • 1/2 cup all-purpose flour
  • 1/2 tsp salt
  • 2 Tbsp butter, melted/softened
  • 2/3 cup milk (or water)
  • Sea salt (for sprinkling)
Directions:
Preheat an oven to 400 degrees Fahrenheit. In a large bowl, combine the flours and salt. Then add the butter and milk (or water). Mix until the dough sticks together and is easy to handle. Once well-combined, knead the dough out on a pastry mat dusted with additional flour. Roll the dough out to a 1/8" thickness. Cut out the shapes that you want (I used a fondant cutter because it was super easy to roll it through the dough), then transfer them to a cookie sheet. Lightly sprinkle with sea salt, and press it into the dough. Place the cookie sheet in the oven and bake for 20 to 25 minutes, or until crispy. Keep an eye on them to be sure they don't burn after 15 minutes.

Whole Wheat Crackers


Despite rolling the dough out very thin, the crackers really puffed up when I baked them! They were kind of crunchy on the outside, but hollow and still a bit soft/chewy on the inside. They were actually more like little mini-pitas than crackers, but they still tasted great! I stored these in an air-tight container, but they seemed to get more chewy, as opposed to crunchy, the next day.

To accompany the crackers, I decided to make my own hummus. It's something I have been wanting to do for awhile and for some reason never got around to doing it. I can't believe how simple it is to make! No more store-bought hummus for us. I turned to my favorite food blog for a recipe, Annie's Eats. I knew she wouldn't disappoint me, and sure enough, she didn't!

Restaurant-Style Hummus

Ingredients:
  • 3 Tbsp lemon juice, from 1-2 lemons (I used ReaLemon juice)
  • 1/4 cup water
  • 6 Tbsp tahini (ground sesame seeds), stirred well
  • 2 Tbsp extra virgin olive oil
  • 1 (14 oz) can chickpeas (garbanzo beans), drained and rinsed
  • 1 small garlic cove, minced or pressed through a garlic press (I used 3 small cloves)
  • 1/2 tsp table salt
  • 1/4 tsp ground cumin
  • Pinch of cayenne pepper (I used ground red pepper)
  • 1 Tbsp minced fresh cilantro or parsley (I omitted this ingredient)
Directions:
Combine the lemon juice and water in a small bowl or measuring cup. Whisk together the tahini and EVOO in a second small bowl or measuring cup.

Add the chickpeas, garlic, salt, cumin and cayenne pepper to a food processor.

Hummus ingredients

Combine until almost fully ground, about 15 seconds. Scrape down the bowl with a rubber spatula. With the machine running, add the lemon juice-water mixture in a steady stream through the food tube. Scrape down the bowl and continue to process for 1 minute. With the machine running, add the oil-tahini mixture in a steady stream through the food tube. Continue to process until the hummus is smooth and creamy, about 15 seconds, scraping down the bowl as needed.

Transfer the hummus to a serving bowl, cover and let stand until the flavors meld, at least 30 minutes, or overnight, in the refrigerator. Store in an airtight container in the refrigerator for up to a week.

Restaurant-Style Hummus


The hummus was super yummy and the kids gobbled it up! :) I would love to try some different varieties in the future (like roasted garlic or roasted red pepper), but for now, this serves as a great basic recipe for this popular dip. I also made some homemade basil pesto to serve too, with the abundance of basil we have growing right now. It was delicious with the crackers/mini pitas!

The boys and I had lots of fun with the shapes playdate and our small group of friends. There are, of course, lots of other activities that could be added for a more structured playdate, but we just let the kids play for the duration of the morning. :) What is your best idea for a fun, themed playdate?

kristy, aka "mom"