Showing posts with label organization. Show all posts

Tuesday, January 1, 2013

Getting Organized: Laundry Room and Hallway

Happy New Year!! One of my resolutions for this year is to complete all of the projects currently on my to-do list. It's a pretty ambitious goal, but I am hoping I can do it. For the new year, I have created a new page/tab that will keep track of all the projects I want to get completed in 2013! I'm hoping this will help motivate me, and keep me accountable to getting them finished.

First up, I finally got around to organizing a space in our house that was driving me crazy. Our laundry room had become a catch-all for too many things, as it also serves as the entryway into the house from the garage. It had become so bad that I didn't even have room to put my laundry baskets in there anymore (not too impressive, given the size of the room, though), which resulted in the boys using them as "pillow baskets," as Ethan calls them, or seats for watching TV. :)

Hey, brother! This sure is a nice seat for watching movies!
As cute as their pillow baskets were, I really wanted the baskets back in the laundry room, along with the rest of the room cleaned up and organized, so I decided it was time to tackle it! I was tired of looking at the space every time I did laundry, or we left the house. I hate having less room than we did in our Georgia house for this space, but I was determined to make it all work. So, I emptied everything out of the room, to start from scratch. I threw a lot of stuff away, moved things to other areas where they belonged, and then organized what was left! Yay!!

I purchased some inexpensive baskets from Walmart to fit inside the cubbies to hide the contents there, and give it a cleaner/neater feel. They coordinate with the ugly wallpaper that I haven't had a chance to take down yet, so that was an added bonus. I would still really love to paint the ugly oak cabinets white, or cream, like the kitchen/bathroom cabinets, but I don't think hubby will let me. :(

Before and After

I used an old hanging mesh rack that I used to use for sweaters, to hold our shoes, instead of the wire cart I was using. This freed up room on the floor of the cabinet for all of our boots now.
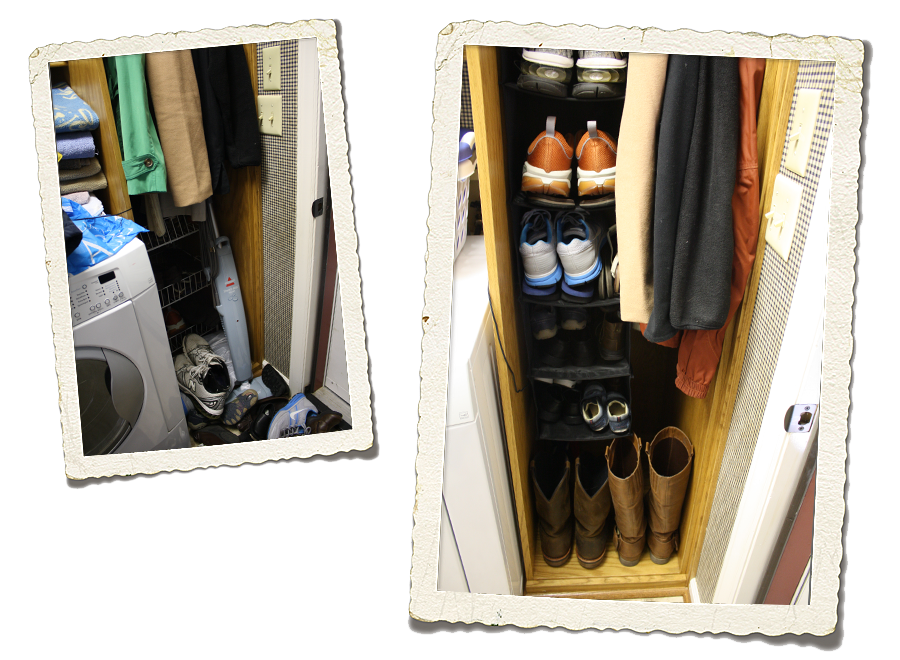
Before and After

I love how this space turned out. I no longer mind going in to do the laundry, and I love that when we come in the door, Ethan puts his and Noah's shoes away for me in their respective cubbie. :)

Another project that I had wanted to complete was a "kids' station" in the hallway right outside of the laundry room, across from the downstairs bathroom. Ethan brings home lots of abstract beautiful artwork from preschool, and I wanted a cute way to display it, aside from hanging it on the refrigerator, as it's getting a bit cramped there. So, I purchased two 11" x 14" picture frames at Michaels (buy one, get one for a penny!), some burlap material, and small clothespins. I wrapped the burlap around the cardboard insert and placed it back in the frame, leaving the glass out. Then I colored the pins black to match the frames (easy to do with a permanent marker!), and hot-glued them to the burlap. Now I can hang his artwork there to display it!


I also wanted a coat hook rack to hang their coats and Ethan's backpack on. I found this cute oil-rubbed bronze one at Target. It's perfect for their little coats. :) To balance the rest of the wall out, I found this decorative mirror and small picture frame (both have an oil-rubbed bronze finish) at Walmart. For now, it's decorated with our last initial, but I'm planning to swap that out for a picture of Ethan on his first day of preschool or one his "official" preschool pictures, then update it each year with a new school pic.

Hallway "kids' station"


I am so happy with how this project turned out and I now love this otherwise under-utilized hallway, which was pretty lonely with just a chalkboard/keychain hook rack. This area of the house is now pretty and organized. On to the other end of the downstairs now...my office is next on my list!


Thursday, October 11, 2012

DIY Paint Chip Wall Calendar

Welcome to those visiting from the Money Saving Expert in the UK, and others here in the US from Pinterest. This entry has become quite popular today (12.05.12) after the pic below was featured in an article about Christmas presents under a fiver! :)

Several months ago, while browsing Pinterest, one of my favorite pastimes these days, I came across a pin linking to this page. The pin was for this cute, colorful wall calendar.

Picture courtesy of Cheltenham Road
I also came across another one on this other page, too. This one looked pretty similar, using the same concepts.

Picture courtesy of Maple & Magnolia
So, I was inspired to try making my own DIY wall calendar as well. :) What's nice about this particular project is how customizable it is. For example, instead of using a poster frame like both of these people did, I purchased a floating frame (at 50% off!) at Michael's. It was 16" x 20", so still nice and big, but looks a little fancier.

You can also customize the colors that you want to use. I picked up my paint chips at Home Depot. The Behr brand has some nice big ones in their premium brand, so I chose those. I decided to go with a dark to light to dark trend with mine. I chose these blue-green hues (UL220-12: Urban Mist, UL220-7: Ozone, UL220-3: Tahoe Blue, and UL220-2: Voyage) because I like them (you'll find these colors throughout our entire house!). The calendar hangs in our kitchen/breakfast nook area, which is painted a neutral shade of tan right now, so I didn't need to try to match/coordinate to any particular colors. Each paint chip was big enough to make 2 squares, so I needed 5 chips of each of the 4 colors I used (20 total chips). Measuring everything out, to allow for 5 rows of 7 (35 total squares), I had room to make my squares 2 1/4" x 2 1/4", then space them 3/8" apart. I used a corner rounder tool to punch out some rounded corners because I liked how that looked better. Using double-sided tape, I secured the squares to the back piece of glass. Then I made a longer rectangle for the top to label the month. Once this was done, I simply put the pieces of glass and frame back together and voilĂ !


I can use a dry-erase marker to write in the dates and what we have going on that day. I like to use a color-coded system that matches up with the colors I assign to each of us in our Cozi calendar. Even though I use this super awesome mobile/online calendar app, I also like seeing the entire month in front of me on the wall. Now that we actually get out of the house most days with activities or appointments, it is very helpful for keeping my sometimes forgetful memory in check. ;)


Along with completing this project, we are finally starting to get more things hung on the walls. We've been in the house for 3 months now, so it's about time! We had our beautiful family pictures taken in April and July this year by Kristy Vest Photography. I decided to hang the most recent ones in our living room. The colors we are wearing match up great with the rug and pillows in that room. :)


We're getting this easy stuff out of the way, then it's time to dig in and get started on the big projects! We're hoping to start our basement remodel soon, along with the back deck/patio overhaul. Hopefully it won't be long before I am posting about those.

Wednesday, August 15, 2012

I'm So Pinteresting!


I'm so Pinteresting! No really. Only people as uber cool as me spend their Friday and Saturday evenings organizing their Pinterest boards. Yep, I am that cool. ;) It is a task (on a very long project to-do list) I have been wanting to tackle for weeks, but I finally got around to starting it a couple weekends ago. If you're a prolific pinner like myself, this post is for you! If you've never heard of or checked out Pinterest, what the heck are you waiting for?!? If you need an invite, I'll be happy to oblige, but beware, please warn your spouse/kids/boss/pets/etc that you'll be ignoring them for at least the next week. The site is a bit addictive (who am I kidding, it's very addictive) and you'll be floored at how many amazing recipes, decor ideas, cleaning products, etc that you will encounter. If you aren't a DIY-er, then it could be your personal hell, but if you're like me, you'll find yourself wanting to re-pin every other pin you see!! Seriously. Don't get frustrated if you aren't the type of person who can find 50 uses for old pallets, or 1,000 different ways to clean using vinegar, though. I'll admit there are some crazy pinners out there, but if you're like me, you'll find it is a useful place to organize yummy recipes, creative ideas and fun projects that you would like to try.

I didn't have very many boards before I started this overhaul...under 20. I had one for most of the recipes I found, but a separate one for desserts. Everything for the home was lumped onto one board. Stuff for the kids or holidays on another. With over 900 pins and counting now, it was getting hard to go back and find things easily. I needed a better system for organizing the boards and pins. So, I started with the board with the most pins, the food. I now break it down like this...

A Guide for Organizing your Pinterest boards
  • The Main Dish
    • Main Dish (this is for miscellaneous items that don't fit into the categories below)
    • Cookin' in the Crockpot
    • Pasta
    • Pizza
    • Salads
    • Sandwiches
    • Soup
  • The Side Dish
    • Breads, Doughs, etc
    • Condiments, Sauces, etc
    • Grains & Potatoes
    • Veggies
  • Sweet Treats
    • Brownies & Blondies
    • Cookies
    • Cakes, Cupcakes & Cake Pops
    • Dips, Dough & Frosting
    • Frozen Treats
    • Fruit
    • Miscellaneous Yummy Treats
    • Pies
  • Drink Up (all beverages, hot & cold)
  • Breakfast
    • Eggs & Meat
    • French Toast & Breads
    • Oatmeal & Granola
    • Pancakes, Muffins, Biscuits & Rolls
  • Recipes I've Tried (links to all of the original recipes I have tried that I found on Pinterest, including my comments about each)
  • Kitchen Tips (useful tips for things to do with the kitchen itself, or for cooking/baking)
Then I moved on to all other items, and came up with these additional boards:
  • Kids
    • Education
    • Food
    • Fun
  • Products I Love (various products/ideas that I want to try)
  • Home
    • Build It!
    • Clean It!
    • Decorate It!
    • Organize It!
    • Store It!
  • This is How I Do Me (hairstyles, clothing, makeup, all thing girly!)
  • Click! Take a Pic! (all things photography)
  • Stitch! Stitch! (all things sewing)
  • Kreations by Kristy (invites, announcements, etc that I have designed)
  • Design Inspiration (things I have found that inspire some of my designs)
  • Holidays (anything related to a particular holiday from food to activities to decorations)
    • Christmas
    • Easter
    • Father's Day
    • Halloween
    • Independence Day
    • St. Patrick's Day
    • Thanksgiving
    • Valentine's Day
  • Get My Workout On! (all things fitness)
  • Articles to Read (links to articles I want to check out or reference later)
  • Parties
    • Birthday (general ideas for any birthday party)
    • Decorations (general decoration ideas for parties)
    • Food Ideas (recipes and ideas for party food/drinks)
    • Specific party themes (I have created a board for each specific party I'm throwing, e.g. parties for the boys' birthdays - Cars, Very Hungry Caterpillar, etc)
  • Tennessee - Local Links (local events, classes, etc that I want to remember)
Whew! I now have 57 boards!


Gorgeous, isn't it?? ;) Yeah, as you can see, it took awhile to organize everything. Unfortunately, there is no easy way to move pins from board to board aside from editing each individual pin. With a mass number to go through, it was a slow process. So, if you are new (or fairly new) to Pinterest, I definitely recommend setting up a board system similar to this (be sure to add boards specific to you, too!) in the very beginning. It will save you a lot of time later when you have hundreds of pins and can't find that one you need!
Happy pinning! And be sure to Follow Me on Pinterest !! ;) Need more help with organization? Check out my line of custom planners in my Etsy shop!


Thursday, March 29, 2012

Organization Tip: Meal Baskets

Welcome Pinterest fans! It appears that my meal basket pin has become quite popular. I hope that you love this idea as much as I do. Please leave me a comment and let me know if you try this one out. :) If you need more help getting organized, please check out the custom planners in my Etsy shop!

I am excited to share a great meal-planning organization tip with you today! Even though I'm not normally in a big rush in the evenings to get dinner to the table, I am sure that most working moms are, along with SAHMs with busy schedules who run kids here, there and everywhere. I know that will be me a few years from now when the boys are in school and involved in extracurricular activities too, so I will be happy that I started this organization system for myself. It's super easy, cheap and can save you precious minutes when the kids are whining that they are hungry and you need to get dinner to the table fast! :)

For as long as I can remember, I have always planned my weekly menu on Sunday afternoons, followed by a trip to the grocery store to get the food we will need for the entire week. I guess this was something I learned from my mom, because it was rare we had to make an extra run to the store to get something in a pinch, aside from our weekly trip. It definitely saves time during the week when you don't need to stop at the store, even if it's just to pick up a few items.

I have now added another step to my weekly meal planning process. I purchased four baskets; one for each night of the week that I cook (Monday through Thursday). We dine out on Friday and Saturday evenings and usually have leftovers or something easy and light, like sandwiches, on Sunday nights. I found these baskets at Walmart and I love the handle on the front that makes them easy to pick up. With limited pantry room at the apartment, I store my baskets on top of the cabinets in the kitchen for now, so the handle makes them easier to grab from way up there. :) Next, I labeled the basket with the day of the week. Yes, I have a label maker and I love it dearly. I am a self-proclaimed geek, and I'm ok with that. ;)

To organize for the week, I place the recipe(s) (Since I have been cooking a lot via Pinterest lately, I have tons of printed recipes floating around the kitchen. Next up will be a re-haul of my recipe book!that I need for each day in their respective basket, along with all of the dry ingredients I will need for the meal, including everything down to salt & pepper or other seasonings. Then when it comes time to make dinner, I can just grab the basket I need and go! For someone in a rush, this could save valuable minutes if you tend to be the type that scrounges through the pantry searching for an ingredient that may have gotten shoved to the back, or is hiding behind something else. In the cramped pantry I am currently using, I have found it harder to get to things sometimes because I have to stack way more than I am used to stacking. :( After this first week, I am considering getting baskets for the refrigerator too, to hold all of the perishable ingredients, but I fear they will take up too much space in our current refrigerator. Perhaps when we finally settle into a house I will revisit that idea?

Below is a pic of this week's baskets. I tried a couple new recipes this week (coming soon! - Baked Brown Rice Balls and Blackened Cajun Chicken with Cilantro Lime Quinoa), and made a couple of our new favorites too (Tomato and Mozzarella Pasta al Forno and Taco Pasta).


The basket for the Tomato and Mozzarella Pasta was a bit cramped with 3 cans of diced tomatoes, a box of pasta, garlic, oregano, salt and pepper, but the ingredients fit well for all of the other meals. I am excited to try making my own taco seasoning tonight for the taco pasta. I just found the recipe this morning and I already have all of the spices I need, so I will give it a try. I feel better about that versus the contents of prepackaged taco seasoning, so I hope I love it just as much!

If you try out this tip, let me know what you think and if it works well for you. If you have any other additional tips, I would love to hear them too! Happy planning! :)